W
webadmin
Guest
View attachment 1589
Items required:
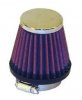
Induction Filter
Adapter Plate for MAF
Large Jubilee Clip
4 25mm M6 bolts
4 m6 hex-nuts
Cable Ties
Tools required:
Socket Set
Flat Head Screwdriver
Allen Key set
Spring Clip Pliers
Clean Cloth
Estimated Time:
1 hour.
Difficulty Rating:
Easy.
WARNING: AS WITH ALL WORK YOU DO ON YOUR CAR, PLEASE BE CAREFUL AND USE COMMON SENSE - IF IT'S HEAVY, DON'T LIFT IT ON YOUR OWN. IF IT'S HOT, DON'T TOUCH IT, OR USE A RAG TO PICK IT UP. IF IT'S SHARP, WEAR GLOVES. IF YOU NEED TO DISTUB ANY ELECTRICAL COMPONENTS, MAKE SURE YOU DISCONNECT YOUR BATTERY FIRST AND IF IT'S ACID - LEAVE IT WELL ALONE!
The purpose of the air inlet in a car, is to allow air to be drawn into the engine, in accurately measured amounts, to be mixed with petrol, compressed and ignited. The process of air being drawn into the engine is called induction; and is used to allow ignition to take place, giving power to the engine. The air filter is in place to make sure that the air that enters the engine is clean and free from harmful particles that may cause damage to the engine.
As standard, the GTI-R, like most cars, utilises a "panel filter". This is a concertina of thick, heavy fibre paper, formed into a rectangular shape. The induction system is housed in a box, more commonly known as an "Air Box". This box is split, internally into two secions, with one side facing the elements and the other side facing the engine. The inside of the box is a single cavity, but it is split into two by the filter itself. The Air Box has a hole either side of the filter to allow air to be drawn from the outside, into the box and into the engine. In doing so, the inducted air must pass through the filter material and this ensures that only clean air passes through. Any dirty particles will be trapped in the fibres, making sure that the air entering the engine, is clean.
Physics say that the maximum flow of air entering the system, can only be equal to or less than, the smallest restriction in the system. The standard Air Box on the GTI-R is very restrictive and the inlet pipe is not ideally situated. Many people fit an "Induction Kit" to their cars to help enhance air flow. The Induction Kit allows for the removal of the standard Air Box and replaces it with a reinforced Air Filter which is attached directly to the MAF. This means that whereas before, the smallest restriction in the system, was probably one of the holes in the Air Box through which air was drawn, the smallest restriction is now, the MAF inlet itself!
Replacement filters come in a variety of shapes, sizes, colours and designs, varying in price enormously. Several friends of mine, managed to find induction kits made by a company called ESE. Although they were huge (about 240mm diameter at the base), they retailed for only £20! - A bargain if ever there was one! Prices can go all the way up to £200, with many of the 'Japanese Performance' items selling for £185, including the Blitz Stainless steel item and the HKS 'Mushroom' kit.
Forge Motorsport have fabricated a Custom Adapter plate for me which allows the use of the K&N induction kit designed originally for the Mitsubishi Lancer EVO VI! This filter is a much larger item than the GTI-R UK K&N design and should flow as much air as I'll ever need. Also, it is cheaper than the UK version even with the adapter plate! This Tutorial has been written around this particular kit and so for other kits, some details may vary.
Induction kits create an "Induction Roar" under acceleration which is nothing to worry about and is sometimes the only reason that people fit an induction kit to their cars! It resembles a loud 'shhhhhhh' sound which when coupled with the noise from the turbo, sounds very "rallyesque"!
Fitting an induction kit has produced varying results on GTI-Rs - Ocasionally, no increase in power is recorded on a Rolling Road; A friend of mine gained 23BHP at the flywheel with the just the addition of an induction kit - A very worthwhile investment! Some people say that it helps alleviate the drop off in power seen on a rolling road graph. I have certainly never heard of a drop in power or torque being experienced after the fitting of an induction kit.
Instructions:
1. With the engine switched off, use a flathead screwdriver to remove the metal retaining clip which holds the MAF connector plug into the MAF itself. - Make sure you don't lose this!
You should then be able to,
2. Gently pull the MAF connector block away from the MAF and towards the cabin to release it. Support the MAF connector away from the area you are working in.
MAKE SURE THAT THIS CONNECTOR IS KEPT CLEAN AND DRY AS DIRT COULD INTERFERE WITH THE SIGNAL, CAUSING PERFORMANCE AND GENERAL RUNNING PROBLEMS DUE TO INCORRECT AIR/FUEL MIXTURES.
3. Slacken the Jubilee clip which joins the MAF to the airbox and pull the inlet pipe free of the Airbox. This may be tricky as there is very little room to manouvere in this area.
4. Undo the 4 clips securing the two parts of the airbox together and lift the upper section clear of the box.
This section houses the MAF and must be handled carefully to avoid damage to the system.
5. Remove the standard air filter panel and discard.
6. Using a 10mm Socket and extention bar, remove the 3 bolts securing the lower section of the airbox to the engine bay lining.
You should now be able to,
7. Lift the lower section of the airbox clear of the engine bay.
If necessary, now is a good time to clean the surrounding area.
The standard airbox uses a pipe to feed cold air to the box. You can leave this in place if you desire. Several people have chosen to create their own cold feed pipe by running a length of piping from the brake ducts to the Induction kit. Or you could always remove the nearside headlight!
8. Using a 5mm allen key or hex driver, remove the 4 bolts securing the MAF to the upper section of the airbox and withdraw the MAF. The airbox is no longer required.
ENSURE THAT NO DIRT OR MOISTURE COMES INTO CONTACT WITH THE MAF.
9. Line up the MAF with the Adapter plate for the induction kit and, when in place correctly, attach together using the four M6 nuts and bolts. Place with nuts on the outside of the MAF to allow you to see if the bolts are becoming slack and unwinding.
GOVERNMENT HEALTH WARNING: Stray nuts and bolts in your induction kit can seriously damage your Turbo.
10. Push the adapter plate into the Induction Cone and use the provided jubilee clip to secure the two together firmly. Don't forget to make sure the logo is the right way up!
11. Re-insert the MAF into the inlet pipe and re-tighten the jubilee clip to secure them in place.
12. Re-connect the MAF connector plug into the MAF itself and replace the metal retaining clip to hold the MAF and plug together.
It may be necessary to fabricate a bracket to support the weight of the Induction Kit, or you may wish to use a cable-tie to attach the cone to something solid. Until I can find the time to fabricate a supporting bar, I am using a cable-tie to hold the Induction kit to the Air-Conditioning pipe! It is only supporting about 500 grams of weight so should hold up with no problems.
CONGRATULATIONS!
You have successfully installed an induction kit into your car! Not only does it smarten up your engine bay, it reduces weight and allows your car to breathe more efficienly!
Items required:
Induction Filter
Adapter Plate for MAF
Large Jubilee Clip
4 25mm M6 bolts
4 m6 hex-nuts
Cable Ties
Tools required:
Socket Set
Flat Head Screwdriver
Allen Key set
Spring Clip Pliers
Clean Cloth
Estimated Time:
1 hour.
Difficulty Rating:
Easy.
WARNING: AS WITH ALL WORK YOU DO ON YOUR CAR, PLEASE BE CAREFUL AND USE COMMON SENSE - IF IT'S HEAVY, DON'T LIFT IT ON YOUR OWN. IF IT'S HOT, DON'T TOUCH IT, OR USE A RAG TO PICK IT UP. IF IT'S SHARP, WEAR GLOVES. IF YOU NEED TO DISTUB ANY ELECTRICAL COMPONENTS, MAKE SURE YOU DISCONNECT YOUR BATTERY FIRST AND IF IT'S ACID - LEAVE IT WELL ALONE!
The purpose of the air inlet in a car, is to allow air to be drawn into the engine, in accurately measured amounts, to be mixed with petrol, compressed and ignited. The process of air being drawn into the engine is called induction; and is used to allow ignition to take place, giving power to the engine. The air filter is in place to make sure that the air that enters the engine is clean and free from harmful particles that may cause damage to the engine.
As standard, the GTI-R, like most cars, utilises a "panel filter". This is a concertina of thick, heavy fibre paper, formed into a rectangular shape. The induction system is housed in a box, more commonly known as an "Air Box". This box is split, internally into two secions, with one side facing the elements and the other side facing the engine. The inside of the box is a single cavity, but it is split into two by the filter itself. The Air Box has a hole either side of the filter to allow air to be drawn from the outside, into the box and into the engine. In doing so, the inducted air must pass through the filter material and this ensures that only clean air passes through. Any dirty particles will be trapped in the fibres, making sure that the air entering the engine, is clean.
Physics say that the maximum flow of air entering the system, can only be equal to or less than, the smallest restriction in the system. The standard Air Box on the GTI-R is very restrictive and the inlet pipe is not ideally situated. Many people fit an "Induction Kit" to their cars to help enhance air flow. The Induction Kit allows for the removal of the standard Air Box and replaces it with a reinforced Air Filter which is attached directly to the MAF. This means that whereas before, the smallest restriction in the system, was probably one of the holes in the Air Box through which air was drawn, the smallest restriction is now, the MAF inlet itself!
Replacement filters come in a variety of shapes, sizes, colours and designs, varying in price enormously. Several friends of mine, managed to find induction kits made by a company called ESE. Although they were huge (about 240mm diameter at the base), they retailed for only £20! - A bargain if ever there was one! Prices can go all the way up to £200, with many of the 'Japanese Performance' items selling for £185, including the Blitz Stainless steel item and the HKS 'Mushroom' kit.
Forge Motorsport have fabricated a Custom Adapter plate for me which allows the use of the K&N induction kit designed originally for the Mitsubishi Lancer EVO VI! This filter is a much larger item than the GTI-R UK K&N design and should flow as much air as I'll ever need. Also, it is cheaper than the UK version even with the adapter plate! This Tutorial has been written around this particular kit and so for other kits, some details may vary.
Induction kits create an "Induction Roar" under acceleration which is nothing to worry about and is sometimes the only reason that people fit an induction kit to their cars! It resembles a loud 'shhhhhhh' sound which when coupled with the noise from the turbo, sounds very "rallyesque"!
Fitting an induction kit has produced varying results on GTI-Rs - Ocasionally, no increase in power is recorded on a Rolling Road; A friend of mine gained 23BHP at the flywheel with the just the addition of an induction kit - A very worthwhile investment! Some people say that it helps alleviate the drop off in power seen on a rolling road graph. I have certainly never heard of a drop in power or torque being experienced after the fitting of an induction kit.
Instructions:
1. With the engine switched off, use a flathead screwdriver to remove the metal retaining clip which holds the MAF connector plug into the MAF itself. - Make sure you don't lose this!
You should then be able to,
2. Gently pull the MAF connector block away from the MAF and towards the cabin to release it. Support the MAF connector away from the area you are working in.
MAKE SURE THAT THIS CONNECTOR IS KEPT CLEAN AND DRY AS DIRT COULD INTERFERE WITH THE SIGNAL, CAUSING PERFORMANCE AND GENERAL RUNNING PROBLEMS DUE TO INCORRECT AIR/FUEL MIXTURES.
3. Slacken the Jubilee clip which joins the MAF to the airbox and pull the inlet pipe free of the Airbox. This may be tricky as there is very little room to manouvere in this area.
4. Undo the 4 clips securing the two parts of the airbox together and lift the upper section clear of the box.
This section houses the MAF and must be handled carefully to avoid damage to the system.
5. Remove the standard air filter panel and discard.
6. Using a 10mm Socket and extention bar, remove the 3 bolts securing the lower section of the airbox to the engine bay lining.
You should now be able to,
7. Lift the lower section of the airbox clear of the engine bay.
If necessary, now is a good time to clean the surrounding area.
The standard airbox uses a pipe to feed cold air to the box. You can leave this in place if you desire. Several people have chosen to create their own cold feed pipe by running a length of piping from the brake ducts to the Induction kit. Or you could always remove the nearside headlight!
8. Using a 5mm allen key or hex driver, remove the 4 bolts securing the MAF to the upper section of the airbox and withdraw the MAF. The airbox is no longer required.
ENSURE THAT NO DIRT OR MOISTURE COMES INTO CONTACT WITH THE MAF.
9. Line up the MAF with the Adapter plate for the induction kit and, when in place correctly, attach together using the four M6 nuts and bolts. Place with nuts on the outside of the MAF to allow you to see if the bolts are becoming slack and unwinding.
GOVERNMENT HEALTH WARNING: Stray nuts and bolts in your induction kit can seriously damage your Turbo.
10. Push the adapter plate into the Induction Cone and use the provided jubilee clip to secure the two together firmly. Don't forget to make sure the logo is the right way up!
11. Re-insert the MAF into the inlet pipe and re-tighten the jubilee clip to secure them in place.
12. Re-connect the MAF connector plug into the MAF itself and replace the metal retaining clip to hold the MAF and plug together.
It may be necessary to fabricate a bracket to support the weight of the Induction Kit, or you may wish to use a cable-tie to attach the cone to something solid. Until I can find the time to fabricate a supporting bar, I am using a cable-tie to hold the Induction kit to the Air-Conditioning pipe! It is only supporting about 500 grams of weight so should hold up with no problems.
CONGRATULATIONS!
You have successfully installed an induction kit into your car! Not only does it smarten up your engine bay, it reduces weight and allows your car to breathe more efficienly!
Attachments
-
 5.4 KB Views: 1